Saturday, August 31, 2013

August Re-Make Recap

I can't even believe that it will be September tomorrow. Where did the summer go?! It seems like winter just ended, and now we're only a few months away from it again. But I'm going to wring every ounce of fun I can get out of autumn this year, as I do every year.

It was kind of a hectic/emotional month for us: Joe and I celebrated 9 years of marriage, and two weeks later our firstborn started kindergarten. We didn't always stay on a schedule, but I did manage to make a bunch of our favorites this month.


It just wouldn't be a recap without taco rice, right? This shows up in our rotation at least once every couple of months, and it's always a favorite. Eating this meal always ends with Joe and I having a tense discussion in the kitchen, trying to decide who will get to take the leftovers to work for lunch.


Andrew requested pepperoni pizza puffs for his "night before kindergarten" dinner. I also made them another time this month, when it was just me and the boys home for dinner. These are so simple, and the flavor is just awesome. They're like pizza rolls on steroids, and they taste much better too. I keep meaning to try a Hawaiian version with green pepper, ham, and pineapple -- but we all love the pepperoni version so much that I haven't gotten around to trying it yet.


I think it's pretty obvious by now that I love chicken Caesar everything, and these chicken Caesar salad sandwiches are one of my favorites. They hit all the same notes as a traditional Caesar salad, but in sandwich form (and with bacon). Absolutely delicious.


Joe claims that biscuits with sausage gravy is the very best meal I make, so I'm a little bit embarrassed by how easy this recipe is. But despite that, I truly do believe that it's the best sausage gravy ever. It's so tangy and sweet and creamy...just perfect. I served it with some really delicious scrambled eggs (I'll share that recipe, though it's hardly a recipe at all, with you soon), and Joe and the boys made sandwiches by piling the gravy and eggs on the biscuits. If you make one recipe from this site, I beg you to try this one.


There aren't many recipes that have survived from the early days of our marriage, but this smothered chicken is one of the ones that has. I mean, this dish is just incredible -- spicy chicken breasts smothered in peppers, onions, mushrooms, and tons of cheese...I'm salivating just thinking about it.


I think these ranch chicken tacos are my favorite weeknight meal when I want something super quick, simple, and delicious -- which, let's be honest, is pretty much every night. They literally come together in minutes, and they're so incredibly good.


It had been so long since I'd made this recipe for bow ties with spicy sausage in tomato cream sauce that I was blown away all over again by how delicious it is. It's so simple, made with only a handful of ingredients, but the flavor is just amazing.


I made Joe an Asian noodle bowl with fried eggs one night when he got home pretty late from his weekly softball game, after the boys and I had already eaten. Normally I'd just make him a sandwich in those instances (or he'd make himself one), but I think this recipe is just about as quick as making a sandwich. I just made a basic version for him, but I'm still interested in playing with the ingredients in these noodle bows -- maybe adding some carrots or cabbage.


Speaking of fried eggs, these bacon cheddar cornbread cakes with fried eggs have skyrocketed right to the top of our favorite dinners. I don't know what possessed me to even buy a box of cornbread stuffing when I discovered it in my cupboard the first night I made these -- but now I find myself buying it on purpose just so I can make these cakes. This time around, I served them alongside the most perfect summer tomato I think I've ever had. What a delicious meal.


Just as Andrew requested pepperoni pizza puffs for the night before kindergarten, he requested his favorite meal, this sweet and spicy pork and asparagus stir fry, for dinner after his first day. At my friend Sarah's suggestion, I served the pork mixture combined with angel hair pasta instead of over rice. It tasted even better that way -- which is really saying a lot.


Ever since rediscovering this recipe, I've made creamy tomato tortellini with chicken and broccoli no less than four times. It's definitely a crowd-pleaser, and it's so delicious and simple. If you haven't noticed...those are my very favorite kinds of meals. :)

Friday, August 30, 2013

Chipotle Cherry BBQ Pulled Pork Sandwiches with Cherry-Corn Relish


I can't believe that Labor Day weekend is upon us already! That means it's almost my favorite time of year -- fall. Even though autumn won't officially be arriving for three weeks, to me, Labor Day always heralds the beginning of my favorite season.

The produce this summer has been absolutely fantastic, and I'm really going to miss summer's bounty as cooler temperatures arrive. So, today, on what is to me one of the last days of summer, I thought I'd share a recipe that celebrates the best of the season -- cherries and sweet corn. And it's a crave-worthy one.

Since I made the peach BBQ sauce last month, I've been dying to make another fruit-infused BBQ sauce. I decided to use cherries this time around, since they're so readily available. I paired the sauce with tender shredded pork and a quick sweet-tangy-spicy relish composed of cherries, sweet corn, jalapenos, and a bit of lime juice. 

These sandwiches are phenomenal. The chipotle cherry BBQ sauce is sweet, spicy, and smoky, and the juicy pork pairs perfectly with the crisp relish. The flavors are just awesome. Joe raved about these sandwiches, and the boys both gave them two thumbs up -- and even requested the leftovers for lunch the next day. These sandwiches definitely celebrate the best of summer, and they'd be perfect for your Labor Day celebrations this weekend.

I'm including my recipe for the pulled pork, because I loved the flavor and texture of it prepared this way. But feel free to use any shredded pork recipe you like.

Chipotle Cherry BBQ Pulled Pork Sandwiches with Cherry-Corn Relish
sauce adapted from Tasty Kitchen

For the pork:

2 pounds pork tenderloin
Salt and pepper
1 tablespoon olive oil
1 teaspoon apple cider vinegar
3 sprigs thyme leaves
2 whole cloves garlic
1 cup chicken stock

For the BBQ sauce:

4 strips bacon, diced
Half of a white onion, chopped
3 cloves garlic, minced
1 cup ketchup
1 1/2 cups fresh cherries, pitted, roughly chopped
1/2 cup brown sugar
1/4 cup maple syrup
1 1/2 tablespoons chipotle in adobo puree
1 tablespoon Worcestershire sauce
Salt and black pepper to taste

For the cherry-corn relish:

3 ears sweet corn, kernels removed from the cob
2 tablespoons finely chopped fresh cherries
1 jalapeno pepper, finely chopped
Juice of 1 lime
Salt to taste

For the sandwiches:

Hamburger buns
Mayonnaise

1. Place the pork in a Crock pot. Add salt, pepper, olive oil, and cider vinegar and rub the seasonings into the meat using your hands. Add thyme, garlic, and chicken stock. Cover and cook on low for 8 hours, or until the meat shreds easily with a fork. Remove the thyme leaves and drain the stock (I save it in the freezer for later use). 

2. To make the BBQ sauce, cook the bacon in a large, high-sided skillet over medium-high heat. When the bacon is nearly crisp, add the onion and cook until softened. Add the garlic cloves; cook and stir 30 seconds. Add the ketchup, cherries, brown sugar, maple syrup, chipotle in adobo puree, and Worcestershire sauce. Reduce the heat and simmer over medium-low until thickened, about 20 minutes. Taste for seasoning and add salt and black pepper to taste.

3. While the sauce is thickening, make the relish. Stir together the corn, cherries, and jalapeno in a small bowl. Add lime juice and salt and stir to combine.

4. Add the pork to the thickened BBQ sauce and mix gently to combine. Pile the pork on the bottom of a bun. Top with relish. Smear bun tops with mayonnaise, if desired.

Wednesday, August 28, 2013

Roasted Potato and Tomato Gyro Wraps


I can't believe it's been a week since the last time I posted! I have no good excuses, really. I typically try to write posts for the week in the evenings, but I've been preoccupied with other things. And by other things, I mean Game of Thrones (which Joe and I are finally watching!) and this amazing, incredible book, which I believe should be required reading for every single person, everywhere in the world.

One other current obsession, though, is this recipe, which I've been eating for lunch every single day for the past two weeks -- and I show no signs of getting sick of it any time soon. I had these wraps on one of our weekly menus but didn't make them for one reason or another, and, since Greek food isn't Joe's favorite, I decided to just make a big batch for myself for work lunches. Best decision ever! 


I can't get enough of these wraps. The combination of crispy roasted potatoes, soft and sweet roasted tomatoes, tangy feta, cool cucumbers, and creamy tzatziki is just perfect. I love these so much, there are just no words.

In the recipe below I have assumed that, like me, you will make a huge batch of these gyro wraps to eat all week long. If you don't want to do that (you'll be sorry...), you can easily adjust the measurements.

Roasted Potato and Tomato Gyro Wraps
inspired by Fitbie

2 pounds baby red potatoes, quartered
1 pint cherry or grape tomatoes
3 tablespoons olive oil, divided
1 1/2 tablespoons Greek seasoning, divided
Tzatziki sauce (the sauce listed in this taco recipe is my favorite)
Feta cheese
1 English cucumber, diced
Flour tortillas

1. Preheat the oven to 475 degrees. Arrange the potatoes on a baking sheet in a single layer. Drizzle with olive oil and sprinkle with 1 tablespoon of Greek seasoning and distribute evenly using your hands. Roast potatoes for 25 to 30 minutes, until browned and crispy. Set aside.

2. Arrange the tomatoes on the same baking sheet. Drizzle with remaining tablespoon of olive oil and 1/2 tablespoon of Greek seasoning; combine with your hands. Roast for 10 minutes or until the tomatoes burst.

3. Place some potatoes and tomatoes in the center of a warmed flour tortilla. Top with tzatziki sauce, diced cucumber, and feta cheese. Wrap and serve.

Wednesday, August 21, 2013

Taco Omelets


Do you ever have one of those "Duh? Why didn't I think of that??" moments? I have them frequently and, especially these days when Pinterest is so widely-used, I think probably most people have them. Or maybe I'm just trying to convince myself of that so I don't feel so silly.

Anyway, this particular head-slapping moment came when I was surfing Instagram a few weeks ago, and my friend Denise posted a photo of a taco omelet that she was having for breakfast. A taco omelet. It's just like a taco, but uses eggs instead of a tortilla. I felt like Monica from Friends when I discovered this, and I'm pretty sure I actually said "GET OUT" out loud.

I made these that very night. I didn't get super fancy with the ingredients because I just used what I had on hand, but they could be jazzed up in a bunch of different ways. Pretty much any way you can eat a taco, you can eat a taco omelet. You just have to try this simple and delicious dinner.

Taco Omelets
inspired by Creative Kitchen

1 pound ground sirloin
1 onion, diced
2 cloves garlic, minced
2 tablespoons taco seasoning
8 eggs
Splash of milk
Salt and pepper to taste
Canola oil
Shredded cheese
Salsa, sour cream, and any other toppings you like for serving

1. Brown the ground sirloin with the onion and garlic in a large skillet over medium-high heat. Once the meat has cooked, sprinkle in the taco seasoning and add a bit of water to loosen it. Remove from heat.

2. Beat the eggs with a little milk and some salt and pepper in a bowl. Heat canola oil in a large non-stick pan. 

3. Add about 1/4 of the egg mixture (2 eggs' worth) to the skillet and cook, without turning, until eggs are cooked through. Top half of the omelet with some of the reserved ground beef and shredded cheese, then fold the other half of the omelet over the top. Remove to a plate and keep warm while you repeat the process with the remaining eggs, meat, and cheese.

4. Serve omelets with salsa, sour cream, and any other desired toppings.

Monday, August 19, 2013

Ridiculously Good BBQ Chicken Sandwiches


I do a lot of lily-gilding when I'm cooking and thinking about cooking. When I'm brainstorming recipe ideas, I always start with a really simple concept; in this case, it was bacon-wrapped chicken tenders. And then my mind inevitably goes to this really ridiculous place, like: Ooo, what if I basted them with BBQ sauce and put them on a sandwich? And what if I added gouda cheese? And caramelized onions? By the time I was finished creating this sandwich, what started out as a really simple dish had a few additional components that elevated it to ridiculously good status. Thus the title of this post. And thus this amazing sandwich.

Honestly, I don't really know what else I need to tell you about these sandwiches. They're loaded with bacon-wrapped chicken tenders, BBQ sauce, creamy, melted, smoked gouda cheese, and sweet, buttery caramelized onions. And a smear of creamy mayo, too (see lily-guilding referenced above). It's ridiculously good, and ridiculously good-looking too (bonus points if you get that reference).

Ridiculously Good BBQ Chicken Sandwiches

2 large onions, sliced
4 tablespoons butter
2 tablespoons olive oil
Salt and peper
8 chicken tenders
8 strips of bacon
1 cup prepared BBQ sauce
1 cup smoked gouda cheese, shredded
4 hoagie rolls, split and toasted
Mayonnaise

1. In a Dutch oven or high-sided skillet, melt the butter and olive oil over medium-low heat. Add the onions, season with salt and pepper, and cook, stirring frequently, until onions are caramelized.

2. Meanwhile, season chicken tenders lightly with salt and more generously with black pepper. Wrap a strip of bacon around each tender. Heat some olive oil in a large skillet over medium-high heat and add the tenders, bacon-seam-side down, until they're cooked through and the bacon is crispy. Reduce the heat to medium-low and baste the tenders with the BBQ sauce.

3. To make a sandwich, add two tenders to a roll bottom. Top with 1/4 cup of the shredded gouda and a pile of caramelized onions. Smear the top of the  roll with mayonnaise and close the sandwich. Serve.
 

Friday, August 16, 2013

Beer-Battered Zucchini Rings


It happens every year around this time, without fail. Someone pawns off on gifts me with a gigantic zucchini from their garden. It happened again this year, of course; Joe's grandma sent him home from a visit with a really big zuc that I'm almost positive was longer than both of the boys when they were born. 

As it does every year, the zucchini sat on my counter for nearly a week, mocking me, daring me to tackle it. Finally I just said to myself, you know what? I'mma fry this sucker. And that's exactly what I did. I dunked it in some beer and hot sauce, then gave it a bath in some hot oil. Sometimes you just have to go for it, you know?

The thing with these big zucchini is that they're full of seeds...seeds that aren't really digestible when they reach that size. So I sliced the zucchini into rings, then used a small knife to hollow out the seed area in the middle. Easy peasy! And holy cow, were these delicious. Zucchini has such a great flavor all on its own, but when paired with yeasty beer, spicy hot sauce, a perfectly crunchy exterior and some ranch for dipping? Ugh, they're perfect. Just perfect. If I could use an emoji in a blog post, I'd use the smiley face guy that has hearts where his eyes should be.

If you, too, have a gigantic zucchini languishing in your garden or on your counter, use it to make these rings. You'll be really glad you did, I promise.

Beer-Battered Zucchini Rings
adapted from Homegrown & Healthy

1 big zucchini, sliced into 1/4-inch thick rings and seeds removed
1 cup flour 
3/4 cup beer
1 teaspoon hot sauce (more to taste)
Coarse salt
Vegetable oil for frying
Ranch dressing for dipping, if desired

1. Heat vegetable oil in a high-sided skillet or Dutch oven to 350 degrees.

2. Combine the flour, beer, and hot sauce in a large bowl. 

3. Completely submerge the zucchini rings in the batter, coating them generously, then immediately place in hot oil. Cook until the first side is crispy, then flip and let the other side crisp up. Remove to paper towels to drain and sprinkle with coarse salt while still hot. Serve immediately with ranch dressing for dipping.

Wednesday, August 14, 2013

Farfalle with Chicken in Sun-Dried Tomato Pesto Cream Sauce


For Mother's Day this year, one of my gifts from Andrew was a little questionnaire about me that his teacher helped him fill out. It was just about the sweetest thing ever. He was off on my age by one year, but he made up for making me a year older by saying that I smelled like cherries and that I'm the best mom ever because I'm the "best cooker ever." It was so adorable, and pretty much turned me into a pile of mommy goo.

He also said that his favorite thing for me to cook is pasta, and is that ever true. I'm very proud to say that Andrew is a fantastic eater and will chow down on anything I put in front of him, but on the nights we're having pasta? I really don't even need to tell him what kind of pasta it is. Just hearing that we're having pasta is enough to make his eyes light up. That's my boy. 

Pasta is one of my favorite things to cook, too, mainly because it doesn't usually require me to make a trip to the grocery store to purchase any special ingredients. I can make it last-minute, just using what I have on hand in the pantry and fridge. And sometimes, those last-minute, quick pasta dinners result in some of the most delicious meals. 

For this pasta, I used chicken, farfalle, sun-dried tomato pesto, garlic, parmesan, and a bit of cream. Just a handful of ingredients, but they resulted in one decadent pasta dish. Not surprisingly, this dish got a big seal of approval from Andrew -- and from the rest of my pasta-loving family.

Farfalle with Chicken in Sun-Dried Tomato Pesto Cream Sauce

12 ounces dried farfalle pasta
1/2 pound chicken tenders, diced
Salt, pepper, and Italian seasoning to taste
1 tablespoon olive oil
1 tablespoon butter
3 cloves garlic, minced
1/2 cup chicken stock
1 cup heavy cream
1/4 cup parmesan cheese, plus more for topping
1/4 cup sun-dried tomato pesto

1. Cook pasta in boiling salted water according to package directions; drain. I always like to return the cooked pasta to the hot pot and add a bit of butter and parmesan cheese to the pasta itself, stirring until melted. This step is optional, of course, but I think it helps the sauce stick to the pasta better (and adds flavor and richness, of course).

2. Meanwhile, season chicken with salt, pepper, and Italian seasoning. Heat the olive oil in a high-sided skillet over medium-high heat. Add the chicken and cook, stirring occasionally, until browned and cooked through. Remove chicken from skillet; set aside and cover with foil to keep warm.

3. In the same skillet, melt the butter. Add the garlic and cook and stir for 30 seconds. Add the chicken stock and, using a wooden spoon, scrape any browned bits from the bottom of the pan. Add the cream, reduce heat to medium-low, and let the sauce gently heat through and thicken. Once sauce has reached desired thickness, stir in the parmesan cheese until melted, then stir in the sun-dried tomato pesto. Taste for seasoning and adjust as needed.

4. Add the drained pasta and the reserved chicken to the sauce and stir gently to combine. Sprinkle each serving with additional parmesan cheese, if desired.

Monday, August 12, 2013

Southern-Style Banh Mi Sandwiches


I think I mentioned in my July recipe recap post that we hosted a pig roast at our place on the Fourth of July. Honestly, there were a lot of people involved in the process, so it was a pretty disorganized affair -- but in the end there was half a pig roasting on a spit in our back yard at 5 AM on July 4. By 6 PM that pig was perfectly cooked and smoked and ready to be shredded and devoured.

There were about 20 of us eating, but there were about 80 pounds of meat, so needless to say we had a lot of leftovers. Everyone was sent home with a gallon bag full of the pork, and Joe and I were still left with three gallon bags to use. In fact, two of those bags are still in our freezer. 

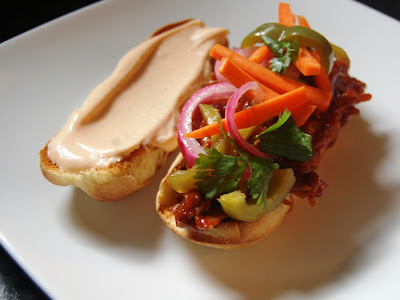
I didn't waste any time using some of the leftovers to make these sandwiches, which had been on my radar for a long time. The banh mi is traditionally a Vietnamese-French fusion sandwich, but in this recipe, it gets a Southern spin with BBQ pork and sweet-pickled peppers and onions. I was surprised to find how well the flavors all worked together, and I think I'd eat that sriracha mayo on just about anything. Maybe I'll defrost some more of that pork so we can have these again this week...

Southern-Style Banh Mi Sandwiches 
adapted from MyRecipes

For the pickled peppers and onions:

1/2 of a red onion, sliced
Ice water
1 green bell pepper, cut into strips
1 cup white vinegar
6 tablespoons white sugar
2 teaspoons kosher salt
1/2 teaspoon crushed red pepper flakes

For the sandwiches:

4 hoagie rolls
1/2 cup mayonnaise
2 teaspoons sriracha hot sauce
1/4 cup sliced carrots
1 teaspoon fish sauce or oyster sauce
2 cups cooked and shredded pork
1 cup of your favorite BBQ sauce
Fresh cilantro leaves

1. To make the pickled peppers and onions, soak the onions in ice water for 10 minutes; drain. Place the onions and sliced peppers in a sealable jar (I used a pickle jar).

2. Bring vinegar, sugar, salt, and crushed red pepper flakes to a boil in a small saucepan over medium-high heat, stirring occasionally, until sugar is dissolved. Pour the hot vinegar mixture over the vegetables in the jar. Let stand uncovered for 1 hour, then seal the jar and refrigerate until serving (the longer they refrigerate the better they'll taste).

3. To make the sandwiches, toast the hoagie rolls in the broiler. Meanwhile, combine the sriracha and the mayo and set aside. Add the fish sauce to the carrots and set aside. Heat the pulled pork with the BBQ sauce in a medium saucepan, if needed.

4. To assemble the sandwiches, layer the bottom halves of the rolls with pulled pork, pickled peppers and onions, carrots, and cilantro leaves. Spread the roll tops with the sriracha mayo. Serve immediately.  

Friday, August 9, 2013

Avocado Bacon Tomato Melts


I've probably mentioned this 20 times already, but I've been sort of obsessed with sandwiches this summer. Actually, I've been obsessed with sandwiches for quite some time, but I seem to be even more obsessed than usual lately. The reasons are probably pretty obvious: Sandwiches are quick and easy, and it's almost a given that they be served with chips, which negates the need for me to prepare a separate side dish. Easy cooking nights FTW! Also, my boys love sandwiches, and I find that they'll eat just about anything if it's placed between two slices of bread.

Although these melts are served on just once piece of bread (an English muffin, actually), the boys loved these. Typically they're not fans of avocado (I know -- how are they my kids?!), but they more than willingly ate it on these melts.

Joe and I loved these, too. The melts start with a toasted English muffin half, topped with a smear of chipotle mayonnaise, sliced avocado, sliced summer tomatoes, bacon, and Swiss cheese. They're broiled until the cheese is melted and gooey and all of the ingredients are warmed through. They're insanely delicious, so simple, and definitely a new summer go-to meal for us.

Avocado Bacon Tomato Melts
adapted from Twirl and Taste

4 English muffins, split
1/2 cup mayonnaise
1 tablespoon chipotle in adobo puree
1 avocado, halved, pitted, and sliced
8 slices of tomato, salted
1 pound bacon, cooked to desired crispness
8 slices Swiss cheese

1. Preheat the broiler to high. Arrange the English muffin halves on a baking sheet, cut-side up. Broil until toasted.

2. Stir together the mayonnaise and the chipotle in adobo puree. Divide evenly among toasted muffin halves. 

3. Top each muffin with sliced avocado, a slice of tomato, 2 slices of bacon, and a slice of Swiss cheese. Return to the oven and broil until cheese is melted. Serve immediately.

Wednesday, August 7, 2013

Perfect Homemade Corn Dogs


If I have one weakness when it comes to "fair food," it would definitely be corn dogs. Oh, wait: I just remembered funnel cakes. So, I guess have two weaknesses. Then there's that lemonade slush...and the spice-roasted almonds...Okay, okay. I have lots of weaknesses when it comes to fair food, but today we're talking about corn dogs.

I've made corn dogs at home one other time, but those, while delicious, didn't hold a candle to this recipe. These corn dogs are absolutely perfect -- crunchy and a little bit sweet, and exactly like the ones they serve at the fair. The boys absolutely loved them, and loved helping me make them too. (They dunked the skewered hot dogs in the batter.)

Because I'm kind of a cheapskate, I didn't use a Dutch oven or similarly large soup pot to fry these bad boys (I don't have a deep fryer). I used a skillet with high sides, still filled pretty full, and I held on to the skewers as I cooked the corn dogs, twisting them constantly to get them evenly-browned. It worked well. So if you don't want to waste nearly as much oil, I recommend that method. 

However you choose to fry them, though, you gotta make these. They're awesome. 

Perfect Homemade Corn Dogs
from Life as a Lofthouse

1 cup yellow cornmeal
1 cup all-purpose flour
1/4 cup sugar
1 tablespoon baking powder
1/4 teaspoon salt
1 egg, beaten
1 1/2 cups milk or buttermilk
1 tablespoon vegetable oil
1 tablespoon honey
10 hot dogs
10 wooden skewers or chopsticks
2 Quarts Vegetable Oil, for frying

1. In a medium or large pot, add the oil. Turn heat to medium and heat oil to 350 degrees.

2. In a large bowl, add the cornmeal, flour, sugar, baking powder and salt. Stir together. Then add the beaten egg, milk or buttermilk, oil and honey. Stir until combined. 

3. Remove hot dogs from package. Wipe them all dry with a paper towel (this will help the batter stick to them better). Insert one skewer or wooden stick into each hot dog.

4. Pour the batter into a tall drinking glass. Holding by the skewer, take one hot dog and dunk it into the batter, coating all of the hot dog. Slowly remove from batter and let a little excess batter drip back into the cup. 


5. Immediately place the hot dog into the hot oil, while still holding the stick. Turn as necessary to brown all sides. Cook for 2 to 3 minutes, or until all sides are a deep golden brown. Remove from hot oil and place on paper towels to drain grease. Repeat with all hot dogs.

Monday, August 5, 2013

Corn Bacon Cheddar Bake


Since I have now made this dish three separate times, all three times to rave reviews and multiple requests for the recipe, I figured it's high time that I share it with you. This is one of those recipes that everyone needs in their lives.

Basically, it's corn, bacon, and cheddar cheese, all bubbling together in a creamy sour cream sauce. It's perfectly seasoned and incredibly flavorful, with the sweet corn balancing out the smoky-salty bacon perfectly. And it's so easy to prepare, and can be served warm or at room temperature, which makes it perfect for cook-outs this summer. In fact, I think it's replaced broccoli salad as my go-to dish for family get-togethers. And that's really saying a lot, because my family is nuts over that broccoli salad. They may be even more nuts over this corn.

Corn Bacon Cheddar Bake
adapted from Taste and Tell

8 slices bacon, chopped
1 small red or white onion, chopped (I've made it with both, and think I prefer it with red onion)
2 cloves minced garlic
Salt and pepper to taste
2 tablespoons flour
1 1/2 cups sour cream
1 1/2 cups freshly-shredded cheddar cheese, divided
1 package frozen corn
Chopped chives or scallions for garnish

1. Preheat the oven to 375 degrees. Spray a 1-quart baking dish with cooking spray.

2. Cook the bacon in a large skillet over medium-high heat until crispy; using a slotted spoon, remove to a paper towel-lined plate to drain.

3. Add the onion to the bacon drippings and cook until softened. Add the garlic and season with salt and pepper to taste; cook and stir for 30 seconds. Stir in the flour until completely absorbed. Remove from heat.

4. Stir in the sour cream and 1 cup of the cheddar cheese until melted. Stir in the corn and half of the bacon. 

5. Pour into the prepared baking dish. Top with the remaining 1/2 cup of cheese and the rest of the bacon. Bake for 20 to 25 minutes, until heated through. Sprinkle with chopped chives or scallions before serving.


Friday, August 2, 2013

Cheddar-Fried Summer Squash


Can we talk about Pinterest for a minute? Can we? Because I'm kind of addicted to it here lately. I was doing so well there for a while; I wasn't checking it at all. But then, one afternoon a few weeks ago, I opened the app on my phone...and BAM. I was hooked all over again. Apparently, with me, Pinterest is an all-or-nothing sort of thing. I'm not one of those people who can log in and pin just two or three things. Oh no; I must PIN ALL THE THINGS! All The Food-Related Things, really, because I may actually make that stuff. I am not likely to turn a glove into a stuffed monkey or upcycle an old TV stand into a play kitchen. I know this about myself. So I mostly stick to the food.

I sure am glad I came back to Pinterest, because one of the first things I pinned in all my renewed pinning glory was this recipe for cheddar-fried squash. Are you kidding me?! Where has this recipe been all my life? And get this: The ingredients of the original recipe include the words, "Oil for frying, I used bacon grease." Yes. YESSS. Needless to say, when I made these, I also used bacon grease. (What? You don't have a tub of bacon grease in your freezer just waiting for recipes like this to come along? Really?)

Bacon grease aside, let's talk about the luscious squash itself. Summer squash is delicious on its own, but in this recipe, it gets a coating of panko breadcrumbs and cheddar cheese, creating this delicious, crispy-gooey sort of layer. It works perfectly with the tender squash. Talk about a perfect summer side dish -- these crispy golden discs of deliciousness are positively addictive.

Cheddar-Fried Summer Squash
adapted from Tasty Kitchen

3 medium summer squash
3/4 cup panko breadcrumbs
1/4 cup shredded cheddar cheese
Salt and pepper to taste
2 eggs, beaten
1/2 cup all-purpose flour
Oil for frying (Bacon grease. DO IT.)

1. Slice the squash into 1/4-inch thick slices. 

2. Combine the panko, cheddar cheese, and salt and pepper in a shallow dish (I like to use a pie plate.) Place the eggs and flour in separate shallow dishes.

3. Heat the oil in a large skillet over medium-high heat. 

4. Dip the squash slices in the egg, then in the flour, then in the egg again, then in the panko-cheddar mixture. 

5. Gently place the breaded slices in the oil and fry until golden and crispy, 3-4 minutes per side. Remove to paper towels to drain and sprinkle with salt.