Thursday, February 19, 2009

Macaroni and Cheese with Peas and Bacon

I've been meaning to make this macaroni and cheese for a while, and I finally got around to it last night. Tyler Florence says this is "the only" macaroni and cheese recipe I'll ever need, and while I don't know if that's exactly true, his version of the classic is absolutely delicious. I loved the topping; the smokiness of the bacon and the sweetness of the peas and the sharp bite of the onion worked so well together, and the white cheddar cheese was the perfect compliment. This was just...yummy. There's no better word to describe it. Well, maybe besides comforting.

I changed this recipe up a bit, mostly out of necessity; I had to omit the fresh herbs and garlic cloves because I didn't have them on hand, and I cut the recipe in half so we weren't bogged down with leftovers. The recipe below is the original, which feeds 6 to 8, and my changes are reflected in purple.

The Ultimate Macaroni and Cheese with Peas and Bacon
Source: adapted from Tyler's Ultimate

Kosher salt
1 pound elbow macaroni (I used shells)

3 tablespoons unsalted butter
3 tablespoons all-purpose flour
4 cups warm milk
5 1/2 cups shredded sharp white cheddar cheese
Freshly ground black pepper
1/4 cup chopped fresh flat-leaf parsley (omitted)

Extra-virgin olive oil
4 slices bacon, cut crosswise into thin strips
1 large onion, diced
2 garlic cloves, smashed (I used a sprinkle garlic powder)
Leaves from 1/4 bunch of fresh thyme (I used a few pinches of dried)
2 cups frozen peas, thawed in a colander under cool water

1. Bring a pot of salted water to a boil over high heat. Add the macaroni and cook until al dente. Drain.

2. Preheat the oven to 400 degrees.

3. Melt the butter in a large, deep skillet over medium heat. Whisk in the flour and cook for about 1 minute, stirring constantly to keep lumps from forming. Gradually whisk in the milk and, whisking vigorously, cook until the mixture is thick and smooth. Stir in 4 cups of the cheese and continue to cook and stir to melt the cheese. Season with salt and pepper. Add the cooked macaroni and the parsley and fold that all in to coat the macaroni with the cheese mixture. Scrape into a 3-quart baking dish and sprinkle with the remaining 1 1/2 cups of cheese. Bake for 30 minutes, or until hot and bubbly.

4. Meanwhile, heat a 2-count of olive oil in a saute pan. Add the bacon, onion, garlic and thyme and cook for about 5 minutes to soften the onion. (I let the bacon go for a while by itself to get crispy.) Fold in the peas and season with salt and pepper.

5. To serve, scatter the pea and bacon mixture over the mac and cheese.

Tuesday, February 17, 2009

Red Velvet Cheesecake

I printed out Southern Living's recipe for red velvet cheesecake ages ago and filed it away to bake sometime in the future, and like so many recipes it got lost in the shuffle. Thankfully, Peabody posted about it a couple of months ago and reminded me. I meant to make it for Christmas, but time got away from me, and again the recipe went to the back burner. And then Annie posted about it a few weeks ago, and then I just knew I had to make it. I decided it would be the perfect finish to our indulgent Valentine's Day dinner. And it definitely was.

If you like red velvet cake, there's no way you won't love this dessert. It tastes exactly like its more traditional counterpart, and the cream cheese just makes it all the more, well, velvety in texture. And the cream cheese frosting? Genius! And awfully delicious, too.

The bright red color makes this cheesecake so pretty and so dramatic. This dessert is definitely worthy of any special occasion. I think it's going to become an annual Valentine's Day thing in my house, because despite its richness, Joe still managed to eat quite a bit of it all on his own!

Red Velvet Cheesecake
Source: adapted from Southern Living via My Recipes

For the crust:
1 1/2 cups chocolate cookie crumbs
1/4 cup butter, melted
1 tablespoon granulated sugar

For the filling:
3 (8-ounce) packages cream cheese, softened
1 1/2 cups granulated sugar
4 large eggs, lightly beaten
3 tablespoons unsweetened cocoa
1 cup sour cream
1/2 cup low-fat buttermilk
2 teaspoons vanilla extract
1 teaspoon distilled white vinegar
2 (1-ounce) bottles red food coloring

For the frosting:
1 (3-ounce) package cream cheese, softened
1/4 cup butter, softened
2 cups powdered sugar
1 teaspoon vanilla extract

Garnish: cocoa powder

1. For the crust, stir together cookie crumbs, melted butter, and 1 tablespoon granulated sugar; press mixture into bottom of a 9-inch springform pan.

2. For the filling, beat 3 (8-ounce) packages cream cheese and 1 1/2 cups granulated sugar at medium-low speed with an electric mixer 1 minute. Add eggs and next 6 ingredients, mixing on low speed just until fully combined. Pour batter into prepared crust.

3. Bake at 325° for 10 minutes; reduce heat to 300°, and bake for 1 hour and 15 minutes or until center is firm. Run knife along outer edge of cheesecake. Turn oven off. Let cheesecake stand in oven 30 minutes. Remove cheesecake from oven; cool in pan on a wire rack 30 minutes. Cover and chill 8 hours.

4. For the frosting, beat 1 (3-ounce) package cream cheese and 1/4 cup butter at medium speed with an electric mixer until smooth; gradually add powdered sugar and vanilla, beating until smooth. Spread evenly over top of cheesecake. Remove sides of springform pan. Garnish, if desired.

Valentine's Day Dinner for Two

Joe and I have never been huge celebrators of Valentine's Day, but this year more than any other year I wanted to do something special for the two of us. I didn't really feel like going out to eat, because everyone does that on Valentine's Day, and anyway it was probably the worst night to try to find a babysitter for our little man. So I decided to make dinner for us at home. And I'm so glad I did; it was probably one of the best Valentine's Days we've ever spent.

We started out the meal with goblets of champagne with strawberries, and while everything was cooking we snacked on crusty sourdough bread dipped in olive oil and herbs:

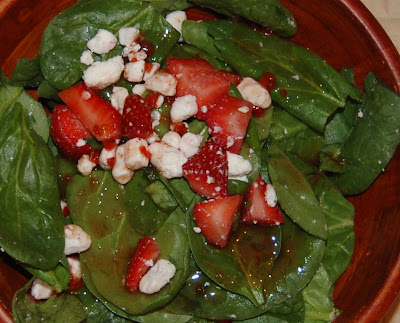
I served a simple salad of baby spinach, strawberries and goat cheese, sprinkled with salt and pepper and dressed with store-bought strawberry balsamic vinaigrette (and FYI, this salad may sound simple, but it was sooooo delicious. Joe proclaimed that it is his new favorite salad, and I plan to serve it at our son's first birthday party in May):

I also made roasted asparagus that I slathered with olive oil, salt and pepper, and garlic powder and cooked in the oven at 425 degrees for 15 minutes. The other side dish was caramelized onion mashed potatoes. I prepared the onions just like I do for my French onion soup, then added them to mashed potatoes along with cream cheese, a touch of heavy cream, and a bit of butter. All that sweet onion flavor really came through in the potatoes, and the cream cheese made them so rich and creamy. They were so good!

For the main event, we had chicken breasts with champagne cream sauce (the recipe is below), which were very, very good. The flavor of the champagne really came through, and the shallots and mushrooms were such a nice addition to the sauce. Letting the chicken poach for a bit in the sauce made it so tender and juicy. Sorry the picture is so out of focus, but I was ready to start our romantic dinner for two!


Chicken Breasts in Champagne Cream Sauce
Source: adapted from
Cooks.com

2 whole boneless, skinless chicken breasts
Salt and pepper to taste
1 shallot, chopped
Half a package of fresh sliced button mushrooms
2/3 cup champagne
1/4 cup heavy cream
1/8 teaspoon salt
1 tablespoon butter

1. Heat olive oil in a large skillet over medium high heat. Season chicken liberally with salt and pepper. Add chicken breasts to the pan and cook about 3 minutes on each side, until golden. Remove chicken to a plate; cover and keep warm.

2. Add the shallots and mushrooms to the skillet and cook until shallots are translucent. Pour in champagne and cook over medium high heat until it is reduced by about half. Add the cream and salt and cook until the sauce thickens slightly. Whisk in the butter. Add chicken back to the pan and cover so chicken can finish cooking in the sauce. Arrange chicken on plates and top with the sauce.

Friday, February 13, 2009

Sweet Strawberry Cookies with Chocolate Cream Filling

The first Valentine's Day that Joe and I spent as a couple was in 2001. I wasn't much of a baker at that time, but I still decided that I wanted to bake some cookies for Joe for Valentine's Day. I came across a recipe for some cookies called "pink pillows" that sounded simple to make and very tasty. It was the first time I'd ever tried to bake cookies without my mom's help.

Alas, because of my relative baking inexperience, I did not know about a little thing called "carry-over cooking." So when the 10 minutes were up and the cookies didn't look quite done, I just left them in the oven instead of taking them out to finish baking. I think I ended up baking one batch of cookies for 30 minutes. Ya'll, I was a novice.

I still remember Joe's face when he tried to bite into one of the cookies. (Yes, I still gave them to him. I knew the bottoms of the cookies were burnt to a crisp a little bit brown, but I thought they might still be all right.) But Joe could barely bite into them, they were so hard. When he finally got a bite off, I watched his face crinkle up as he mumbled, "They're delicious." I remember being so touched at his sweetness that I actually cried a little bit. Mostly, though, I think the tears were from sheer embarrassment.

Joe mentions those cookies every Valentine's Day and teases me about them mercilessly. I kept the recipe and I've been meaning to redeem myself for quite some time now. This year was the year.

To make the cookies more special, I decided to make little strawberry cookie sandwiches with chocolate cream filling in the middle. These cookies are such a sweet treat for Valentine's Day. These are very cakey cookies and don't spread when they're baking, so next time I think I'll flatten them before baking so they're not quite as thick. I do think they're awfully cute, though, as they are; they look like little scoops of strawberry ice cream. I doubled the cookie recipe, which gave me 25 cookie sandwiches.

I have officially redeemed myself. Joe loves these, and so do I. Happy Valentine's Day, everyone!

Sweet Strawberry Cookies with Chocolate Cream Filling
Source: cookie recipe adapted from Meals.com; chocolate cream filling recipe from Baking Delights

For the cookies:
4 cups all purpose flour
1 teaspoon salt
1/2 teaspoon baking soda
1 cup (2 sticks) butter or margarine, softened
1 cup granulated sugar
1 cup Nestle Nesquik Strawberry Flavor Powder
2 teaspoons vanilla extract
4 large eggs

For the filling:
2 tablespoons unsalted butter, softened
4 ounces cream cheese, softened
2 ounces semisweet chocolate, melted and slightly cooled
3 tablespoons sugar

1. Preheat oven to 375ยบ.

2. Combine flour, salt and baking soda in small bowl. Beat butter, sugar, Nesquik and vanilla extract in large mixer bowl until creamy. Add eggs one at a time, beating well after each addition. Gradually beat in flour mixture. Drop by rounded tablespoons onto ungreased baking sheets.

3. Bake for 8 to 10 minutes. Cool on baking sheets for 2 minutes; remove to wire racks to cool completely.

4. While cookies are baking, prepare the filling. Cream butter and cream cheese in a medium bowl. Beat in melted chocolate and sugar, scraping down the sides as needed. Place filling in a plastic bag; snip one corner of the bag.

5. Pipe the filling onto the bottom side of 25 cookies. Top with the other 25 cookies, pressing cookies together firmly to adhere filling. Refrigerate.

Wednesday, February 11, 2009

Lasagna Soup

First of all, I have to give the credit to Jessie for linking to this recipe on her blog. Otherwise, I probably never would have discovered this soup, and I would have missed out on all the deliciousness. So thank you, Jessie, for sharing this!

This soup is nothing short of amazing. What a way to celebrate my 100th post! It really does taste a lot like lasagna, and it was so much quicker and so much less fussy to make. The whole time we were eating, the only thing Joe and I kept saying back and forth was, "This is really good. This is so good." The idea of putting the ricotta mixture and cheese at the bottom of the bowl and stirring it into the soup was absolutely genius. I mean, just look at all that creamy goodness waiting to be scooped up!

I modified the recipe quite a lot, to make fewer servings (which, after tasting this, I realized was a mistake; I wish I had leftovers today) and also to accommodate the ingredients we had on hand, and I've listed it below as I made it. Clicking the link will take you to the original recipe. This soup was sweet and spicy and creamy and comforting and just...yummy. It is now officially a family favorite. I suggest trying it right away!

Lasagna Soup
Source: adapted from Family Fun

2 teaspoons olive oil
1 pound spicy sausage
1 onion, finely chopped
2 garlic cloves, minced
1 teaspoon Italian seasoning
1 tablespoon tomato paste
1 (14.5-ounce) can diced tomatoes with garlic and olive oil
5 cups beef broth
1/2 cup tomato basil spaghetti sauce
1 bay leaf
4 ounces rotini pasta
4 ounces ricotta
1/4 cup grated Parmesan
1/8 teaspoon salt
Pinch of pepper
1 cup shredded mozzarella

1. In a large pot, heat the oil over medium heat. Add the sausage and sautรฉ, breaking it up into small pieces with a wooden spoon, until the sausage is no longer pink, about 5 to 7 minutes. Drain any excess fat from the pot. Add the onions and sautรฉ until softened, about 6 minutes. Add the garlic and Italian seasoning and sautรฉ for 1 minute. Add the tomato paste and sautรฉ until the paste turns a rusty brown, about 5 minutes. Add the tomatoes with their juice, the spaghetti sauce, the broth, and the bay leaf and bring the soup to a boil. Reduce the heat and simmer for about 30 minutes.

2. Add the pasta, then increase the heat to medium-high and boil the soup until the pasta is tender to the bite, following the time recommendations on the pasta package. Discard the bay leaf. If desired, season with salt and black pepper to taste.

3. In a small bowl, combine the ricotta, the Parmesan, the 1/8 teaspoon of salt, and the pinch of pepper. To serve, place about 1 1/2 tablespoons of the ricotta mixture in each bowl, sprinkle with some of the mozzarella, and ladle the soup on top.

Monday, February 9, 2009

Salisbury Steak

Up until last night, I may have been the only person on Earth who'd never tried salisbury steak. No, not even the TV dinner version! Isn't salisbury steak, like, a staple in most families? Well, it never was in mine, and we never ate TV dinners, so when I saw this recipe I knew I had to try it.

This was quite tasty and made for a nice, old-fashioned dinner last night (which we ate in front of the TV, as fate would have it). My steaks weren't as moist as they probably should have been because I had to omit the milk from the recipe since ours had soured. The sauce was truly delicious, though. We're talking about ground beef here, so it's probably no surprise that the "steaks" put me more in mind of meat loaf than anything. I served this with creamed corn and fried potatoes. I don't know how often I'll be making this in the future, but I'm definitely glad I tried it.


For the patties:
1 pound extra-lean ground beef (I used 85/15 ground round, which worked fine)
1/2 cup unseasoned dry bread crumbs
1/2 cup milk
1 egg white
1/4 cup finely chopped onion
1 teaspoon Worcestershire sauce
1/4 teaspoon salt
1/4 teaspoon pepper
1/4 teaspoon garlic powder

For the gravy:
3/4 cup beef broth
1/4 cup dry red wine
1 tablespoon corn starch
1/2 teaspoon dried thyme leaves
1 2.5-ounce jar sliced mushrooms, drained

1. In medium bowl, combine all patty ingredients; mix gently. (Mixture will be moist.) Shape into 6 oval patties, about 3/4-inch thick.

2. Spray large nonstick skillet with nonstick cooking spray. (I used olive oil.) Heat over medium heat until hot. Add patties; cook 3 minutes on each side or until browned. Remove patties from skillet; drain, if necessary.

3. In small bowl, combine broth, wine, cornstarch and thyme; blend well. Pour into same skillet. Cook over low heat until mixture boils and thickens, stirring constantly. Stir in mushrooms. (I actually let my mushrooms saute in the pan drippings before I added the sauce to the pan, because I like to let them get a little color on them.) Return patties to skillet. Cover; simmer about 15 minutes or until patties are no longer pink in center.

Joe's Potatoes

These fried potatoes were part of the first meal I made for Joe after we moved in together -- which was probably the first meal I made for him, ever. I made them to go with chicken cutlets smothered with cheese and mushrooms that turned out very dry and really not very good. The potatoes, though -- they were great. That was seven years ago (Wow. SEVEN YEARS), and my cooking skills have improved a lot since then, but Joe still requests these potatoes frequently. I was planning to make mashed potatoes last night, but discovered that our milk had gone bad, so I made these instead.

I wouldn't even be posting this recipe, but for the fact that Joe asked me to. He thinks they're that good. They're so simple, really, and basically just the way my mom used to make fried potatoes; the only difference is that I chop the potatoes differently than she did, and I leave the skins on. It may sound like a lot of butter, but I've found that the potatoes tend to soak up a lot of butter, so you need that much in order to keep them from burning.

Joe's Potatoes
Source: Cassie

2 to 3 pounds golden potatoes, diced or sliced
1 onion, chopped
1/2 cup butter
Salt and pepper to taste

1. Heat butter in a large skillet over medium heat. (If more liquid is needed later, you can add olive oil.)

2. Add potatoes and onion to skillet and season liberally with salt and pepper.

3. Cook over medium heat, stirring frequently, until potatoes are cooked through and crispy.

Wednesday, February 4, 2009

Pepperoni- and Cheese-Stuffed Chicken Breasts

I heard someone say once (it was probably Rachael Ray, yes she can be annoying but a lot of the things she says make sense) that chicken is like a blank canvas, just waiting to be filled. And I thought that was so true. Chicken goes with so many things, it can be used in so many applications -- but it can also get very, very boring.

I love the idea of stuffing chicken, because you can fill it with absolutely anything; there are virtually thousands of recipe combinations out there. I think the trick is just to get creative. When I saw a recipe for pepperoni- and cheese-stuffed chicken on one of my favorite food blogs, A Taste of Home Cooking, I knew immediately that I had to make it. Not only did I have some pepperoni that I needed to use up, it was also a combination of flavors that I'd never tried.

This was really, really good. I followed the Home Cook's suggestion by cutting a slit in the chicken and stuffing it that way, rather than rolling the chicken around the filling. The main change I made to the recipe was that I pan-fried it in olive oil first to make the skin nice and crispy. I loved the combination of flavors, and this was so quick and easy that I think it'll be one of my go-to weeknight dinners from now on.

(By the way, for my absolute number one most favorite stuffed chicken recipe in the world, go here.)

Pepperoni- and Cheese-Stuffed Chicken Breasts
Source: adapted from A Taste of Home Cooking, and she got it from Melissa's Magic in the Kitchen

Boneless skinless chicken breasts
Sliced pepperoni
Shredded cheese (I used mild cheddar)
Italian seasoning
Garlic powder
Salt and pepper

1. Preheat oven to 350 degrees.

2. Cut a slit about halfway into the side of each chicken breast. Stuff with a few slices of pepperoni (I used 4 medium slices per breast) and shredded cheese (I probably used about 1/8 cup per breast). Secure edges with toothpicks, if desired. Season both sides of chicken with Italian seasoning, garlic powder, salt and pepper.

3. Heat a small amout of olive oil in an oven-safe skillet over medium-high heat. Pan fry chicken breasts until browned on both sides.

4. Move skillet to oven. Bake chicken at 350 degrees for about 20 minutes or until cooked through.

Monday, February 2, 2009

Spinach and Cheese Ravioli with Roasted Red Pepper Cream Sauce

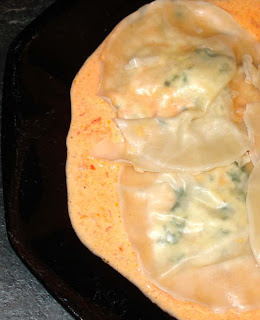
This weekend I had a ton of spinach I needed to use up, so I had this wacky idea to make some ravioli with spinach stuffed inside. Not exactly "from scratch" ravioli, since that would require making my own pasta for which I have not the time, but using refrigerated won-ton wrappers. I've seen it done a lot, and I thought, How hard can it really be?

It wasn't hard, but it was time-consuming. And in the end, I just wasn't all that impressed with the results. The ravioli didn't tear too much for me, but I did find that the texture of the finished product was sort of...slimy. It was a bit unappetizing.

They tasted just fine, once I got past the texture issue; the filling was delicious, and the sauce was very flavorful. But ultimately, using won-ton wrappers just didn't impress me too much. Next time, I'll either make my own pasta, or buy some spinach-filled ravioli at the store and pair it with this sauce.

Spinach and Cheese Ravioli with Roasted Red Pepper Cream Sauce
Source: Cassie

1 package refrigerated won-ton wrappers
8 ounces ricotta cheese
1/2 cup parmesan cheese, divided
1 teaspoon garlic powder
3 cups baby spinach, trimmed
1 cup heavy cream
1 jar roasted red peppers, drained
Salt and pepper to taste

1. On the stove, bring a small pot of salted water to a boil. Add spinach a cup at a time and cook just until softened; drain and squeeze dry.

2. Meanwhile, combine ricotta cheese, 1/4 cup of the parmesan cheese, garlic powder and salt and pepper to taste for the ravioli filling. Mix in spinach.

3. Top each won-ton wrapper with a tablespoon of the filling. Dab a bit of water around the filling and top with a second won-ton wrapper. Pinch around the sides to ensure that the ravioli is tightly sealed.

4. Bring a large pot of water to a boil; add salt and olive oil and reduce heat. Cook ravioli in batches of 10 for about 5 minutes; drain. It's important not to overcrowd the pot.

5. To prepare the sauce, bring heavy cream to a simmer over medium heat. Puree roasted red peppers in a food processor or blender; add to cream. Stir in the remaining 1/4 cup of parmesan cheese and salt and pepper, and simmer until sauce is thickened (do not boil).